Friday, April 23, 2010

Cutting Panels

Now that my trailer is situated and the materials are unloaded, I have started to cut SIPs for the wall panels!

There are two specialized tools I need for cutting & prepping panels: a panel saw and a hot knife.

The panel saw is a pretty cool tool that I recently acquired. Wall panels are 6 1/2" thick, and the roof panels are 8 1/4". In order to make a cut this deep with a power saw, I need a different type of blade than a standard circular saw. Even the largest hand-held circular saws available, besides costing $700, can make only a 6 1/4" deep cut, leaving 2" of panel uncut on roof panels. Another option I thought about was cutting the OSB on one side, flipping the panel & cutting the OSB on the other side, leaving only 2" foam to cut with a handsaw. But an 8'x8' panel weighs about 225 lbs, so I would like to avoid as much as I can flipping the panels.

Enter the beam-cutting saw: This tool is half circular saw, half chainsaw. The top half is my old Makita circular saw (recently replaced with a new DeWalt circular saw). The blade of the saw is where the action is: it is a 12" chain bar attachment called a Prazi Beam Cutter, purchased online for $135, which is run by the circular saw head.


I fitted the saw with a dust collector shroud that attaches to my shop-vac and collects a lot of the little white styrofoam beads from the cut. The saw is working out great, and it's fun to use!

I am now trying to track down a 5 1/2" wide hot knife: this tool has a heating element that is used to melt the styrofoam cores of the panels, in order to create voids to install wood framing lumber into the panels as structurally required. This tool is available commercially for purchase for $180, but I've never done things the easy way - I am attempting to make one myself. I will post my progress on that endeavor...stay tuned!
Sunday, April 18, 2010

Comin' Over the Mountain

I loaded my trailer full of SIPs in Bennington, VT. I figured the load of SIPs at about 3100 lbs, plus 875 lbs trailer weight: just under 2 tons. A small load by road standards, where a tandem semi-trailer might weigh up to 40 tons. Still, if a 2 ton load fell on you, you'd know it. So I treated the load with an appropriate dose of respect.

My friend Sue Bates has offered me a plot of land on which to park my trailer to build my tiny house. The building site is in Ashby, Massachusetts, a nice little spot behind Sue's barn, next to the garden. To get there, I need to haul my fully-loaded trailer 90 miles. We would travel VT Route 9, from Bennington up over Hogback Mountain to Brattleboro, and then into New Hampshire to Ashby. This stretch of road, full of twists and turns, up & down the Green Mountains, happens to be my all-time favorite road; I've driven probably 200 times in my life, and I haven't gotten sick of it yet. I never pulled a trailer over the mountains, though. I was looking forward to it!

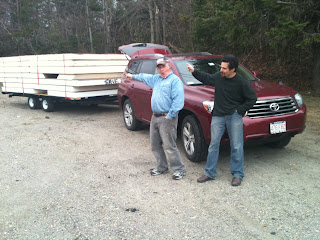
Though my trusty diesel Jetta serves me well as a work-truck, this load is a little beyond what Sparky could handle. My father, Bob, kindly volunteered his Toyota Highlander for the job. Though he feigned reluctance at times, I know that he actually loves playing trucker (he does have reason to be a little gun-shy: he once blew up the transmission on a borrowed truck, driving a horse-trailer halfway across the country; I did everything I could to re-assure him that his Toyota could handle it). He drove over to Bennington to meet me in the yard of Timberline Panel Company, we secured the load with ratchet straps and pulled out onto the road, the Toyota Highlander, the loaded trailer, and Sparky as the chase car.


The load towed quite well going up the mountains. We passed our friends Fred & Roberta, headed the other way, on their way out to vacation. We pulled over to say hi and check the load. Our packing job worked well, and the load had not shifted at all. The trailer was handling its maiden voyage admirably!


We had good weather on the way up the mountain, but as we crested the Green Mountains at Hogback Mountain, the sky was darkening, and as we headed down the other side it began to rain. On the way down the mountain with the trailer pushing from behind, the load "wagged the dog" according to Dad, and gave a bit of a ride to the tow vehicle.

In Brattleboro, after driving through the rain for 30 miles, we decided to pull over in the Fire Department parking lot to tarp our load (of course, it promptly stopped raining). The underside of the load was dripping wet and dirty from road dirt. It made me sure that I would have to weather-proof the underside of Cubit.

The load made it all the way over the mountains with no mishaps. The next trick was to get the trailer into its yard, between the barn and the fencepost, which were about 8 1/2 feet apart (the trailer is 8'-1" wide).

After turning and backing and pulling forward and backing and turning about 28 times, and sinking into the soft soil of the flower bed, we decided to break open the load and hand-carry the panels into the yard (not my favorite choice, as some of the panels were upwards of 200 lbs). But that's what we did, with the help of Herbert Bates (it was a good thing that he happened to be there, otherwise we'd still be backing and pulling forward and backing again). Once we lightened the load, we were able to back the trailer into place. Who knew that after 90 uneventful miles, the last 150 feet would take the most work?

It was exciting to get the trailer to where it will be built, and the panels staged and ready for cutting! Here's a photo of the yard:


Now I have a bit of work prepping the yard and setting up tools, and then I start cutting the panels!

Friday, April 9, 2010

New Tools

On Thursday, I visited another former employer, Jon Harris. Years ago, I worked with Jon in his cabinet-making shop, and we became friends, so I like to drop in on him every now & again and see how things are going.

The last time I saw Jon was maybe 2 years ago, when I helped him to prop up a falling-down shed off the back of his barn. Inside the barn, Jon had a couple of tools sitting under a tarp, and we struck a deal where I bought the tools from him. I hadn't been by to see Jon in the past couple years in order to pick up the tools, but I gave him a call the other day, and sure enough, he said those tools were still sitting there in the barn.

There were two tools: one was a Delta drill press, which is a good tool, and will come in handy. The other, though, is the tool that I am really excited about: it is an Inca combination jointer/planer. It has the capability of squaring lumber and then planing it to finish thickness. This tool will be indispensible to the building of my windows, because I will be building the windows from reclaimed lumber. So when I get this tool working, I will be able to use it to mill all of my lumber to accurate size and squareness, so that I can then cut the precision joinery that will be required for my window sashes.


This is a photo of the Inca as it was loaded in the back seat of Sparky, my trusty little VW diesel Jetta, my "truck".

The Cubit's Trailer

I picked up the trailer, the foundation of my tiny house, on Wednesday.

The trailer was fabricated by Brian Nilsen, who has a metal fabrication shop in his 2-bay garage on a bend in the road between Cambridge and Greenwich, NY. I designed the trailer with Brian, and he & I figured out a lot of the details together: spacing of members, placement of wheels, required suspension clearance underneath the deck, etc... Brian was great to work with, very reasonably priced, a stand-up businessman & all-around good guy. He did a great job building this trailer. He was extremely helpful right up until I drove the trailer off his yard, and I'm sure that he will be a big help in the future, too, with any metal fabrication needs that come up for me.

The specs of the trailer are as follows:
Length: 19'-6"
Width: 8'-1"
Ball height: 16"
Deck Height: 22"
Axles: (2) @ 71" long
Unladen weight: 875 lb
Weight capacity (GVW): 4400 lb (1100 lb per tire x 4)


This is the drawing that I provided for Brian.

The finished road height of the overall structure will be around 13'-0", under the 13'-5" road height maximum.

It is a deck-over trailer; that is, the wheels are entirely underneath the deck, so there is no need for fenders to be built into the house. In fact, the whole double-axle undercarriage is easily removable: remove 6 bolts and it's free. I will salvage 4 jacks from the junkyard, one for each corner, so the whole structure may be lifted, the undercarriage removed, and the house dropped on 4 sono-tube footings, so the house is temporarily permanent (or is that permanently temporary?)

It was exciting to see the first full-size manifestation of my house. I stood on the empty trailer, and got an idea of what it will be like to stand in my tiny house.

I picked the trailer and hauled it to Bennington VT, where I dropped it off in the yard of my former employer, Vermont Timber Frames and Timberline Panel Company.

The manufacturing process of Timberline SIPs is a hydraulic press which creates 8'x24' Structural Insulated Panel. The large size of the SIPs helps speed installation of large surfaces such as industrial roofs. For smaller applications, however, such as SIP or timber frame homes, the 8'x24' panel can be difficult to use efficiently. Sometimes large pieces are cut off and left unused. They often re-sell these to consumers who are building smaller buildings at a discount rate. As a former employee of Timberline, I have been given the benefit of being able to use them to build my house, and thus save them from sitting in the yard as waste. So I will be hauling away enough to build my house with! Thank you Timberline!

Monday, April 5, 2010

SIP Shop Drawings

These are the shop drawings that I will use for cutting and framing the SIP walls. I will be building from waste SIPs, so I will be adding seams where I join smaller panels together.


A Progress Report on my Studies


Energy Efficient Windows & Doors: Design and Build
I began the semester by researching radiant and infrared heat and
insulated glass units. Based upon my research, I have built a mockup
of an energy-efficient window. I have secured a source of reclaimed
wood to build the 9 window units from. I have found a supplier of
insulated glass units, and have obtained a quote from them. I will
execute the order once I have begun to mill the sashes. The cutting
will commence next week.

Strategies for an Effective Building Envelope
For this project, I will be building a SIP building envelope. I have
however researched many building envelope systems such as stick-frame
construction with cellulose (dry-blown and wet-blown), fiberglass,
open- & closed-cell urethane foam, as well as urethane and EPS foam
SIPs. I have drafted to-scale drawings of the 4 walls, as well as
detailed sections of the wall-floor and wall-roof connections.

I designed a steel trailer and had it fabricated. Fabrication was
completed on April 1.

I have secured a source of waste SIPs for the building envelope, in
Bennington VT.. I will register & drop the trailer to begin loading
materials on April 3. I expect to begin raising the structure in 2
weeks.

China & I are meeting once every couple weeks for Building Envelope
and Windows & Doors as necessary to keep up the momentum. We have
great meetings, and I always come away creatively inspired and
motivated.

Sustainable International Development
Fred & I have been bringing to life the One World Leadership Institute
(OWLI), an international leadership training organization. We have
been creating a structure for the organization and a model of
operations, networking with other leadership educators, and collating
and editing content for OWLI's website, which will be published in the
coming weeks. We are planning also for Fred's return to Africa to
pilot OWLI's flagship entrepeneurial training program, the Youth
Leadership Program.

Vernacular Architecture
I have researched the history of early architecture, from its
prehistoric genesis up to the agricultural revolution. I identified
the archetypes of home: the central hearth, the entry, shelter,
functional use of space and adaptation of space to accomodate
specialized tasks.

I have analyzed the geometric structure of one of the most perfect
forms in nature: the nautilus shell. I have created a base for the
construction of a model of a museum in the form of a nautilus, and
obtained willow for construction of the armature of the structure.

Besides building the model of the museum, I will be creating exhibits
to populate the museum:
- A model of a structure from Terre Amata, the oldest known
architectural site
- a comparison of round and rectangular architecture, and the basis of
those shapes in architecture
- a look at the use of the arch in vernacular architecture
- an exhibit on Musgum mud houses and their energy-efficient design.


This is a summary of my progress thus far in these four studies.

I just looked up the date and found out that the end of the semester
is on April 30! I have a lot of work to get done before then.