Wednesday, May 19, 2010
Burning Styrofoam
I have been using the hot knife for the past couple days to fabricate the wall panels.
Burning EPS has a distinctive odor. It reminds me of the smell of Kathmandu in the evening; at the end of the business day, many shopkeepers kept a ritual where they would burn the trash from their day in the gutter. It's a nostalgic smell, that burning plastic aroma (especially when combined with the smell of cheap cigarettes that my crew-mates used to smoke on site). Ah, memories.
But actually, the burning foam, with its thick smoke and smell, made of pure petroleum-derived hydrocarbons, is composed of approximately the same elements as wood smoke: carbon, oxygen and hydrogen. Its smoke is less harmful than smoke from a pine fire.
Styrofoam may not seem to have much "green" cred, being a non-organic petroleum product, but it does have a couple things going for it:
It does create a super-efficient building envelope. My walls, when I'm done, will be as tight as a drum. Air leakage will be minimal, and the insulation value meets or exceeds requirements for such a tiny building. I expect that it won't be difficult to heat my tiny house.
Another benefit of EPS is that it is a durable use of petroleum. I drove to the worksite this morning burning a non-renewable resource (a situation I hope to remedy this summer when I start brewing bio-diesel from vegetable oil). Once petroleum is burnt, it's gone, and the carbon enters the atmosphere. My walls, on the other hand, utilize that same resource daily throughout the life of the building. As long as the walls are standing, the carbon that they are made of is, in the parlance of the green movement, "sequestered", meaning trapped, and providing me with a daily benefit.
Exploring the use of EPS foam in my building envelope is an interesting exercise in sustainability. The panels I am using are waste panels from an inefficient production process; I am saving them from becoming landfill or being incinerated in a waste-to-energy facility. The panels are a durable product which have a net benefit by saving energy over the course of their life-cycle. Large-scale usage of this product may or may not be ultimately sustainable, depending on the design of the manufacturing process. However, for my project, I feel pretty good about using SIPs, and I'm learning a lot in the process.
The sustainability of consuming petroleum products on the large scale that we do is highly questionable. Petroleum, though it is a non-renewable resource, is quite an amazing product. The versatile molecules can be cracked and recombined in a myriad of ways, resulting in an array of products that benefit us every day. Limited, judicious usage of petroleum products can be beneficial. Exploring sustainable alternative to petroleum such as biofuels and soy-based foam products is well worthwhile.

Thursday, May 13, 2010
SIP Wall Mockup
Finally, I acquired a hot knife, and construction has resumed.
Here is the tool:

And here is the wall mockup I made with it:

This is an illustration of the corner where the walls & floor meet. Of particular interest is the box post at the corner, built from 2x material, and filled with expanding foam to reduce thermal bridging. Also shown is a surface spline joint, the method of joining two panels with OSB splines.

Here is a drawing showing the corner box post.
Here is the tool:

And here is the wall mockup I made with it:

This is an illustration of the corner where the walls & floor meet. Of particular interest is the box post at the corner, built from 2x material, and filled with expanding foam to reduce thermal bridging. Also shown is a surface spline joint, the method of joining two panels with OSB splines.

Here is a drawing showing the corner box post.
Tuesday, May 11, 2010
Hot Knife
I have this tool that is hanging my project up: a foam-cutting hot knife. I need it to progress to the next step of assembling my envelope. The tool consists of an electric heating element that creates enough heat to melt the EPS foam cores of the structural insulated panels, in order to create voids to insert framing lumber into the panels.
I could buy the tool, but that is $150 or $200 that I'd rather not spend for a single-use tool.
I have been foiled in two attempts to make such a tool: first, some unsuccesful trials with a torch-heated metal bar nixed the idea of a propane-heated element; second, I tried bending heating elements from an electric stove, with dubious results.
I think that I finally found a place that I can rent a hot knife: Winter Panel in Brattleboro VT. I'll be going through tomorrow, and I'll pick it up.
I'm chomping at the bit to get some structure up in the air, and to see this project start to take shape!!!
Tuesday, May 4, 2010

Friday, April 23, 2010
Cutting Panels
Now that my trailer is situated and the materials are unloaded, I have started to cut SIPs for the wall panels!
There are two specialized tools I need for cutting & prepping panels: a panel saw and a hot knife.
The panel saw is a pretty cool tool that I recently acquired. Wall panels are 6 1/2" thick, and the roof panels are 8 1/4". In order to make a cut this deep with a power saw, I need a different type of blade than a standard circular saw. Even the largest hand-held circular saws available, besides costing $700, can make only a 6 1/4" deep cut, leaving 2" of panel uncut on roof panels. Another option I thought about was cutting the OSB on one side, flipping the panel & cutting the OSB on the other side, leaving only 2" foam to cut with a handsaw. But an 8'x8' panel weighs about 225 lbs, so I would like to avoid as much as I can flipping the panels.
Enter the beam-cutting saw: This tool is half circular saw, half chainsaw. The top half is my old Makita circular saw (recently replaced with a new DeWalt circular saw). The blade of the saw is where the action is: it is a 12" chain bar attachment called a Prazi Beam Cutter, purchased online for $135, which is run by the circular saw head.

I fitted the saw with a dust collector shroud that attaches to my shop-vac and collects a lot of the little white styrofoam beads from the cut. The saw is working out great, and it's fun to use!
I am now trying to track down a 5 1/2" wide hot knife: this tool has a heating element that is used to melt the styrofoam cores of the panels, in order to create voids to install wood framing lumber into the panels as structurally required. This tool is available commercially for purchase for $180, but I've never done things the easy way - I am attempting to make one myself. I will post my progress on that endeavor...stay tuned!
There are two specialized tools I need for cutting & prepping panels: a panel saw and a hot knife.
The panel saw is a pretty cool tool that I recently acquired. Wall panels are 6 1/2" thick, and the roof panels are 8 1/4". In order to make a cut this deep with a power saw, I need a different type of blade than a standard circular saw. Even the largest hand-held circular saws available, besides costing $700, can make only a 6 1/4" deep cut, leaving 2" of panel uncut on roof panels. Another option I thought about was cutting the OSB on one side, flipping the panel & cutting the OSB on the other side, leaving only 2" foam to cut with a handsaw. But an 8'x8' panel weighs about 225 lbs, so I would like to avoid as much as I can flipping the panels.
Enter the beam-cutting saw: This tool is half circular saw, half chainsaw. The top half is my old Makita circular saw (recently replaced with a new DeWalt circular saw). The blade of the saw is where the action is: it is a 12" chain bar attachment called a Prazi Beam Cutter, purchased online for $135, which is run by the circular saw head.

I fitted the saw with a dust collector shroud that attaches to my shop-vac and collects a lot of the little white styrofoam beads from the cut. The saw is working out great, and it's fun to use!
I am now trying to track down a 5 1/2" wide hot knife: this tool has a heating element that is used to melt the styrofoam cores of the panels, in order to create voids to install wood framing lumber into the panels as structurally required. This tool is available commercially for purchase for $180, but I've never done things the easy way - I am attempting to make one myself. I will post my progress on that endeavor...stay tuned!
Sunday, April 18, 2010
Comin' Over the Mountain
I loaded my trailer full of SIPs in Bennington, VT. I figured the load of SIPs at about 3100 lbs, plus 875 lbs trailer weight: just under 2 tons. A small load by road standards, where a tandem semi-trailer might weigh up to 40 tons. Still, if a 2 ton load fell on you, you'd know it. So I treated the load with an appropriate dose of respect.
My friend Sue Bates has offered me a plot of land on which to park my trailer to build my tiny house. The building site is in Ashby, Massachusetts, a nice little spot behind Sue's barn, next to the garden. To get there, I need to haul my fully-loaded trailer 90 miles. We would travel VT Route 9, from Bennington up over Hogback Mountain to Brattleboro, and then into New Hampshire to Ashby. This stretch of road, full of twists and turns, up & down the Green Mountains, happens to be my all-time favorite road; I've driven probably 200 times in my life, and I haven't gotten sick of it yet. I never pulled a trailer over the mountains, though. I was looking forward to it!
Though my trusty diesel Jetta serves me well as a work-truck, this load is a little beyond what Sparky could handle. My father, Bob, kindly volunteered his Toyota Highlander for the job. Though he feigned reluctance at times, I know that he actually loves playing trucker (he does have reason to be a little gun-shy: he once blew up the transmission on a borrowed truck, driving a horse-trailer halfway across the country; I did everything I could to re-assure him that his Toyota could handle it). He drove over to Bennington to meet me in the yard of Timberline Panel Company, we secured the load with ratchet straps and pulled out onto the road, the Toyota Highlander, the loaded trailer, and Sparky as the chase car.
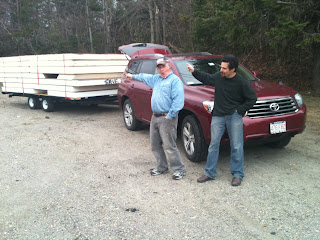
The load towed quite well going up the mountains. We passed our friends Fred & Roberta, headed the other way, on their way out to vacation. We pulled over to say hi and check the load. Our packing job worked well, and the load had not shifted at all. The trailer was handling its maiden voyage admirably!

We had good weather on the way up the mountain, but as we crested the Green Mountains at Hogback Mountain, the sky was darkening, and as we headed down the other side it began to rain. On the way down the mountain with the trailer pushing from behind, the load "wagged the dog" according to Dad, and gave a bit of a ride to the tow vehicle.
 In Brattleboro, after driving through the rain for 30 miles, we decided to pull over in the Fire Department parking lot to tarp our load (of course, it promptly stopped raining). The underside of the load was dripping wet and dirty from road dirt. It made me sure that I would have to weather-proof the underside of Cubit.
The load made it all the way over the mountains with no mishaps. The next trick was to get the trailer into its yard, between the barn and the fencepost, which were about 8 1/2 feet apart (the trailer is 8'-1" wide).
After turning and backing and pulling forward and backing and turning about 28 times, and sinking into the soft soil of the flower bed, we decided to break open the load and hand-carry the panels into the yard (not my favorite choice, as some of the panels were upwards of 200 lbs). But that's what we did, with the help of Herbert Bates (it was a good thing that he happened to be there, otherwise we'd still be backing and pulling forward and backing again). Once we lightened the load, we were able to back the trailer into place. Who knew that after 90 uneventful miles, the last 150 feet would take the most work?
It was exciting to get the trailer to where it will be built, and the panels staged and ready for cutting! Here's a photo of the yard:

Now I have a bit of work prepping the yard and setting up tools, and then I start cutting the panels!
My friend Sue Bates has offered me a plot of land on which to park my trailer to build my tiny house. The building site is in Ashby, Massachusetts, a nice little spot behind Sue's barn, next to the garden. To get there, I need to haul my fully-loaded trailer 90 miles. We would travel VT Route 9, from Bennington up over Hogback Mountain to Brattleboro, and then into New Hampshire to Ashby. This stretch of road, full of twists and turns, up & down the Green Mountains, happens to be my all-time favorite road; I've driven probably 200 times in my life, and I haven't gotten sick of it yet. I never pulled a trailer over the mountains, though. I was looking forward to it!
Though my trusty diesel Jetta serves me well as a work-truck, this load is a little beyond what Sparky could handle. My father, Bob, kindly volunteered his Toyota Highlander for the job. Though he feigned reluctance at times, I know that he actually loves playing trucker (he does have reason to be a little gun-shy: he once blew up the transmission on a borrowed truck, driving a horse-trailer halfway across the country; I did everything I could to re-assure him that his Toyota could handle it). He drove over to Bennington to meet me in the yard of Timberline Panel Company, we secured the load with ratchet straps and pulled out onto the road, the Toyota Highlander, the loaded trailer, and Sparky as the chase car.

The load towed quite well going up the mountains. We passed our friends Fred & Roberta, headed the other way, on their way out to vacation. We pulled over to say hi and check the load. Our packing job worked well, and the load had not shifted at all. The trailer was handling its maiden voyage admirably!

We had good weather on the way up the mountain, but as we crested the Green Mountains at Hogback Mountain, the sky was darkening, and as we headed down the other side it began to rain. On the way down the mountain with the trailer pushing from behind, the load "wagged the dog" according to Dad, and gave a bit of a ride to the tow vehicle.
 In Brattleboro, after driving through the rain for 30 miles, we decided to pull over in the Fire Department parking lot to tarp our load (of course, it promptly stopped raining). The underside of the load was dripping wet and dirty from road dirt. It made me sure that I would have to weather-proof the underside of Cubit.
The load made it all the way over the mountains with no mishaps. The next trick was to get the trailer into its yard, between the barn and the fencepost, which were about 8 1/2 feet apart (the trailer is 8'-1" wide).
After turning and backing and pulling forward and backing and turning about 28 times, and sinking into the soft soil of the flower bed, we decided to break open the load and hand-carry the panels into the yard (not my favorite choice, as some of the panels were upwards of 200 lbs). But that's what we did, with the help of Herbert Bates (it was a good thing that he happened to be there, otherwise we'd still be backing and pulling forward and backing again). Once we lightened the load, we were able to back the trailer into place. Who knew that after 90 uneventful miles, the last 150 feet would take the most work?
It was exciting to get the trailer to where it will be built, and the panels staged and ready for cutting! Here's a photo of the yard:

Now I have a bit of work prepping the yard and setting up tools, and then I start cutting the panels!
Friday, April 9, 2010
New Tools
On Thursday, I visited another former employer, Jon Harris. Years ago, I worked with Jon in his cabinet-making shop, and we became friends, so I like to drop in on him every now & again and see how things are going.
The last time I saw Jon was maybe 2 years ago, when I helped him to prop up a falling-down shed off the back of his barn. Inside the barn, Jon had a couple of tools sitting under a tarp, and we struck a deal where I bought the tools from him. I hadn't been by to see Jon in the past couple years in order to pick up the tools, but I gave him a call the other day, and sure enough, he said those tools were still sitting there in the barn.
There were two tools: one was a Delta drill press, which is a good tool, and will come in handy. The other, though, is the tool that I am really excited about: it is an Inca combination jointer/planer. It has the capability of squaring lumber and then planing it to finish thickness. This tool will be indispensible to the building of my windows, because I will be building the windows from reclaimed lumber. So when I get this tool working, I will be able to use it to mill all of my lumber to accurate size and squareness, so that I can then cut the precision joinery that will be required for my window sashes.

This is a photo of the Inca as it was loaded in the back seat of Sparky, my trusty little VW diesel Jetta, my "truck".
The last time I saw Jon was maybe 2 years ago, when I helped him to prop up a falling-down shed off the back of his barn. Inside the barn, Jon had a couple of tools sitting under a tarp, and we struck a deal where I bought the tools from him. I hadn't been by to see Jon in the past couple years in order to pick up the tools, but I gave him a call the other day, and sure enough, he said those tools were still sitting there in the barn.
There were two tools: one was a Delta drill press, which is a good tool, and will come in handy. The other, though, is the tool that I am really excited about: it is an Inca combination jointer/planer. It has the capability of squaring lumber and then planing it to finish thickness. This tool will be indispensible to the building of my windows, because I will be building the windows from reclaimed lumber. So when I get this tool working, I will be able to use it to mill all of my lumber to accurate size and squareness, so that I can then cut the precision joinery that will be required for my window sashes.

This is a photo of the Inca as it was loaded in the back seat of Sparky, my trusty little VW diesel Jetta, my "truck".
Subscribe to:
Posts (Atom)
